7. Deploy bootstrap
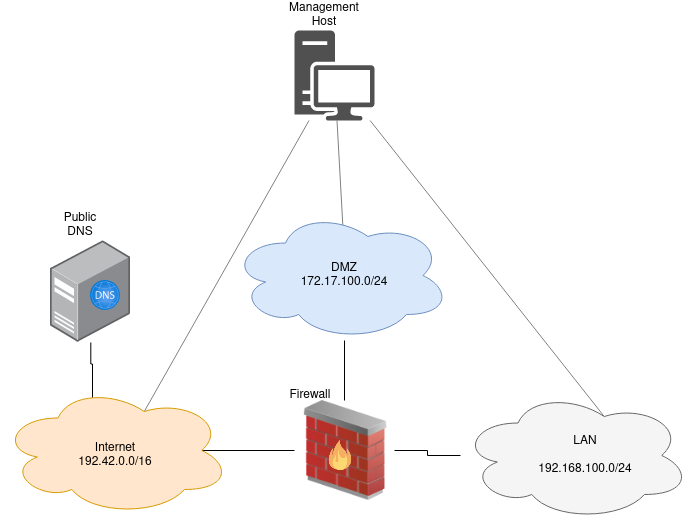
The bootstrap is a basic network infrastructure with all the network components that are required for all the scenarios. This bootstrap can be deployed with terragrunt. The terragrunt/bootstrap/terragrunt.hcl stores variables like “image-names”:
inputs = {
  host_userdata = "firewallinit.yml"
  ext_router = "aecid-testbed-router"
  sshkey = "testbed-key"
  inetdns_image = "ubuntu-2204"
  inetfw_image = "atb-fw-inet-lan-dmz-image-2023-06-09T14-03-06Z"
  mgmt_image = "ubuntu-2204"
  floating_pool = "provider-aecid-208"
}
Please do not change the terragrunt.hcl directly. To change any variable create a new file with the filename terraform.tfvars and change the variables:
ext_router = "myrouter"
inetfw_image = "atb-fw-inet-lan-dmz-image-2023-06-09T14-03-06Z"
sshkey = "my-ssh-key"
floating_pool = "some-floating-pool"
If you built the server images manually you have to change the image-names. It is also necessary to set the external router and the floating_pool. Additionally provide one pre-allocated floating IP with the description “mgmt” (used for the jumphost across deployments). This can be done either in the OpenStack Web Interface OR via openstacksdk on the command line:
openstack floating ip create <network> --description mgmt
After these steps the bootstrap can be deployed:
cd terragrunt/bootstrap
terragrunt apply
Most of the scenarios require a virtual machine for the Attacker. It is also necessary to modify the configuration for the attacker in terragrunt/attacker/terragrunt.hcl and deploy the attacker:
cd terragrunt/attacker
terragrunt apply